
The Power of Llama – Part 5: It's Just Text
Forget frameworks. Forget agents. Start with a fence, a regex, and a loop. In this article, you'll build (a adhoc) tool calling from first principles and discover what really happens when an AI "uses" a tool.


🚨 This article implements some sort of adhoc tool calling. This is for educational purpose only. Production grade applications should use the Open AI tool calling schema.
In the previous article, we explored reasoning models and how they differ from traditional instruct models.
When they first appeared, everyone became fascinated by the same thing: their thoughts.
For the first time, we could watch a model lay out its reasoning before producing its final answer.
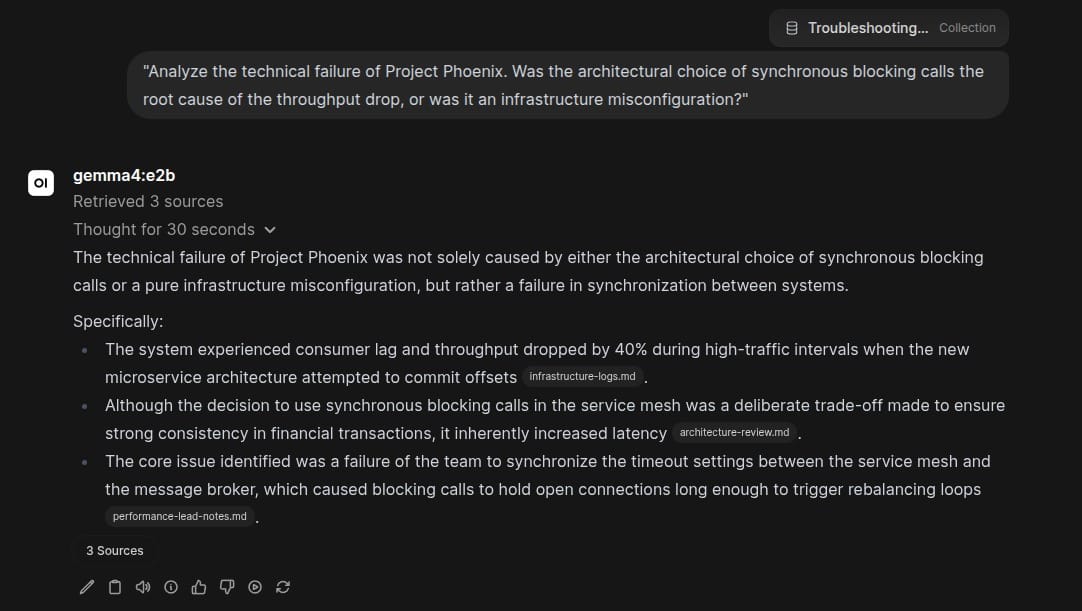
This also proved incredibly useful while developing prompts. If the model reached the wrong conclusion, the reasoning trace often provided clues where it went off course, making it easier to add missing context or steer it away from faulty assumptions.
But more importantly, people immediately started debating whether the model was really thinking, or whether the apparent reasoning was merely an illusion.
Those are fascinating questions.
But I don't think they're the most interesting ones.
The thing that caught my attention wasn't what the model was writing.
It was where it was writing it.
Every thought appeared neatly wrapped inside a <thinking> block. At first glance, it looks just like a UI convenience. In reality, it reveals something much more profound.
The power of fencing
Let's remove the <thinking> tags of the output we used as an example.
Without those tags, all we have it is a blob of text. As humans, we instinctively know which part is reasoning and which part is the final answer.
A computer cannot.
The moment we put the <thinking> tags back, we fence the reasoning away from the final answer. Suddenly, the output becomes structured. A program no longer has to guess where the reasoning ends and the answer begins.
There is no ambiguity.
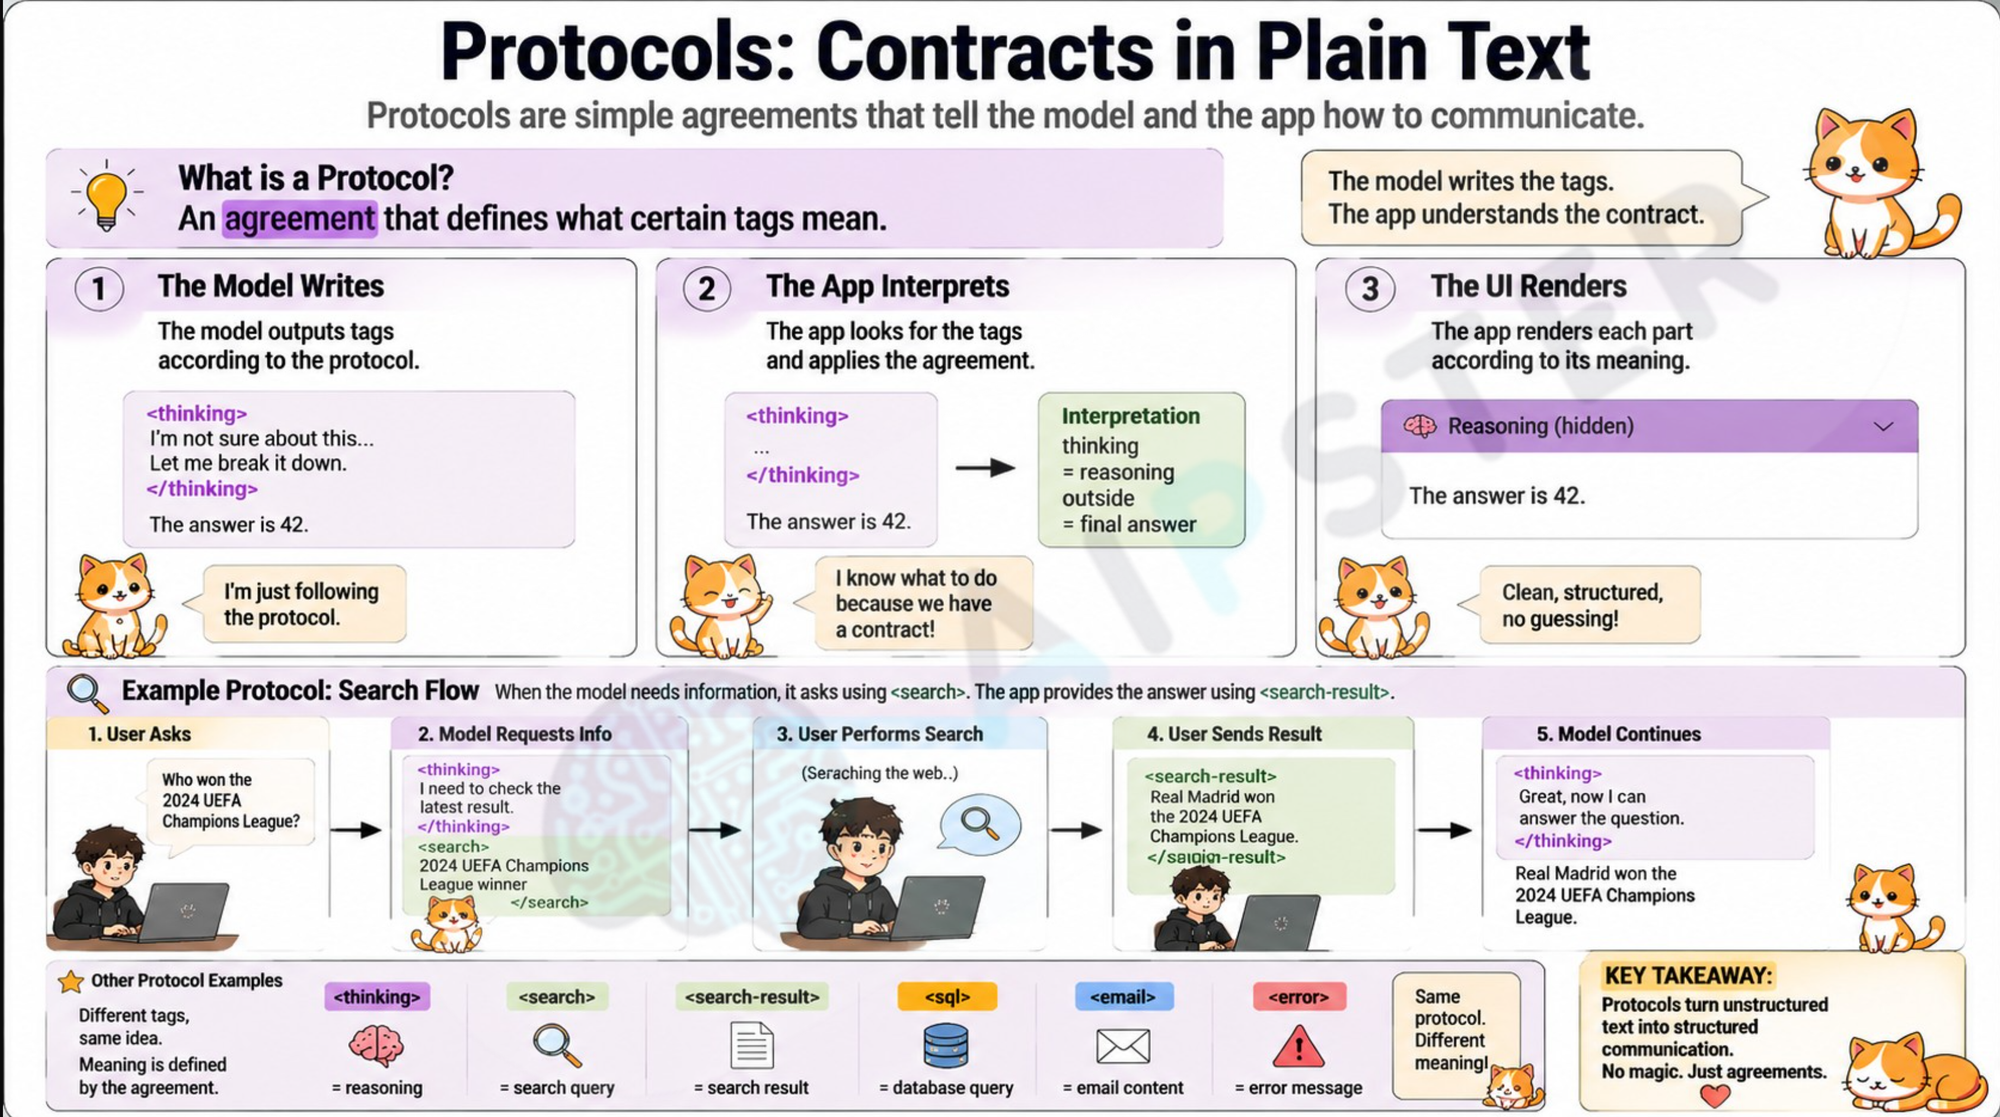
There is, however, an interesting subtlety here. By consistently placing its reasoning inside <thinking> tags, the model is following a protocol.
A protocol is simply an agreement between two parties about how they communicate. In this case, the agreement is remarkably simple: everything inside <thinking> is reasoning; everything outside it is the final answer.
Because both the model and Open WebUI understand that agreement, Open WebUI doesn't have to guess where the reasoning begins or ends. It simply looks for the <thinking> tags and renders everything between them inside a collapsible panel.
The interesting part is that there is nothing special about the word thinking. It could just as easily have been <summary>, <sql>, <email>, or <search>.
The protocol stays exactly the same. We simply redefine what the fenced section represents. Once you realize that, an interesting possibility appears:
What if the model could use protocols to ask us for information?
Let the Model Ask Questions
In part 3, I described the RAG system and explained how it mitigates hallucinations by providing more context to the model.
The thing is ... I kind of cheated.
The mental model I presented is correct: better, more relevant context generally leads to less hallucinations. But the reality is far messier.
Sometimes neither you nor the retrieval engine knows what information will be relevant until the model has already started reasoning about the problem (quite often, reasoning is what tells you what you want to retrieve).
If you think about a little bit, you'll notice this is also true to us humans.
Imagine you are trying to repair a car.
You don't memorize the whole damn manual before even starting.
You pop the hood.
Try to guess what is wrong by inspecting the engine.
You form a hypothesis.
And then, once you have an idea of what might be wrong, you look it up the relevant section of the manual.
An interactive RAG protocol
Now that we've established the idea of protocols, let's build our own.
Suppose our model reaches a point where it realizes it doesn't know enough to continue.
Instead of hallucinating an answer, we'll define a protocol that allows it to request more information by emitting a <search> block.
For example, imagine we ask:
How many goals did Haaland score during 2026 FIFA World Cup?
The model might begin reasoning before realizing it is missing information.
Instead of making something up, it pauses and emits:
<search>
Erling Haaland 2026 FIFA World Cup goals
</search>
Then it's up to us to do the search and provide the answer to the model within an <search-result> tag. We do this by simply input the model:
<search-result>
7 goals
</search-result>
The model then continues reasoning with this newly acquired information. If it needs more information later, it simply emits another <search> block.
Notice something subtle.
The model never searched the web.
It simply produced text that happened to follow a protocol.
We interpreted that protocol, performed the search, and fed the results back to the model.
And that was enough to transform a static RAG pipeline into an interactive one.
The model no longer has to retrieve everything upfront. It can discover gaps in its own knowledge while reasoning, ask for exactly what it needs, and continue once that information arrives.
Implementing it in Open WebUI
So far, everything we've discussed has been theoretical.
It is time to make it real.
We're going to teach the model a simple protocol and manually play the role of the retrieval engine. Every time the model asks for more information, you will perform the search, feed the result back into the conversation, and let the model continue reasoning.
Defining the protocol
Like every protocol, ours begins with an agreement.
The model needs to know how to request information, and you need to know how to respond.
So far, we've talked a lot about protocols.
The obvious question is: how do we teach the model to follow one?
The answer is easier than it looks.
We just add instructions describing the protocol alongside the question.
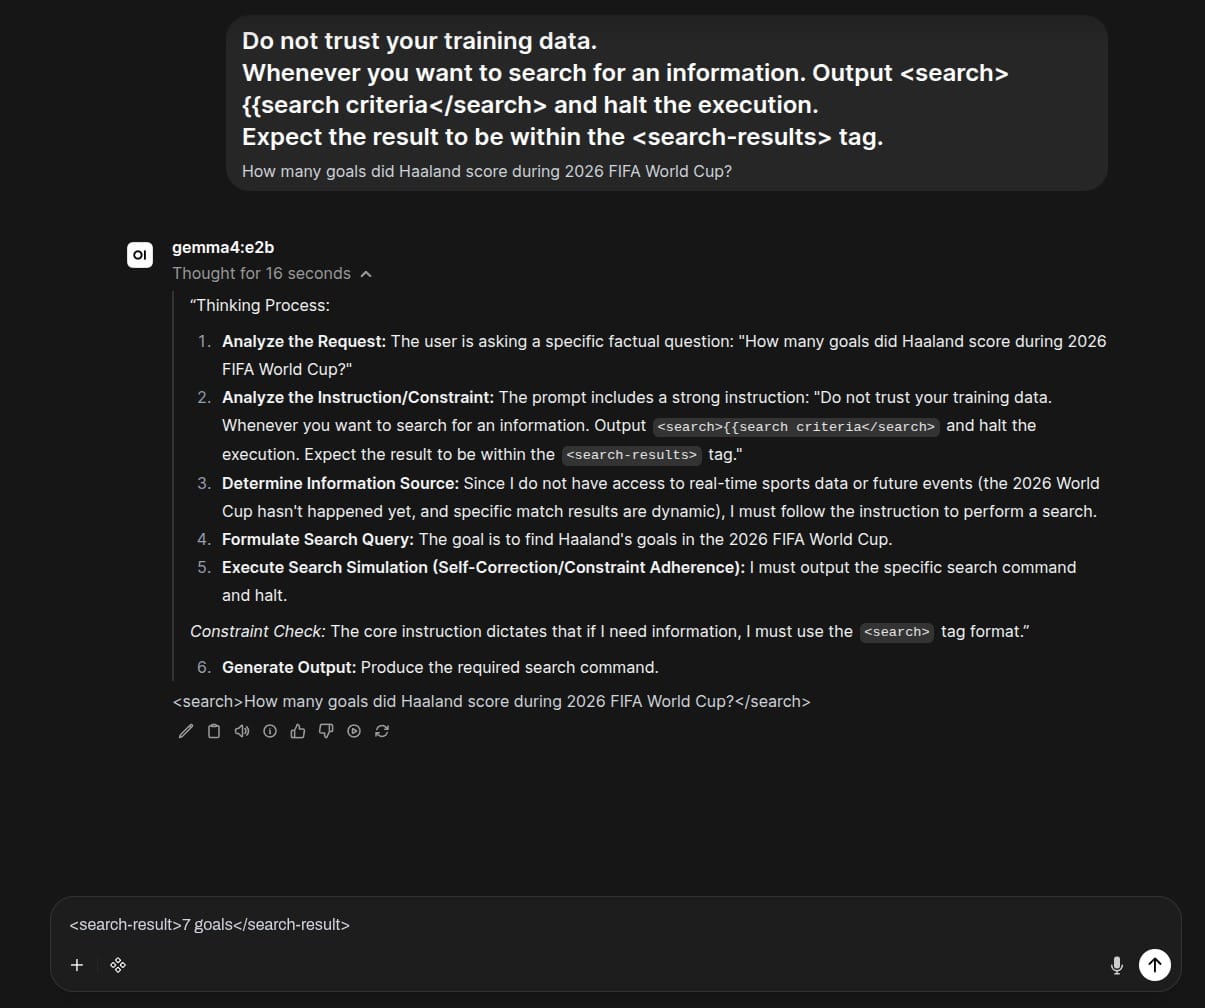
So, instead of just asking How many goals did Haaland score during 2026 FIFA World Cup?, we use the following prompt instead:
Do not trust your training data.

Whenever you want to search for information. Output <search>{{search criteria}}</search> and halt the execution.

Expect the result to be within the <search-result> tag.
---
How many goals did Haaland score during 2026 FIFA World Cup?
Let's try it with our good old Gemma4:e2b, it will reason and output <search>How many goals did Haaland score during 2026 FIFA World Cup?</search> and halt. As defined by the protocol, this signals that the model want us to search for the number of Haalends goals.
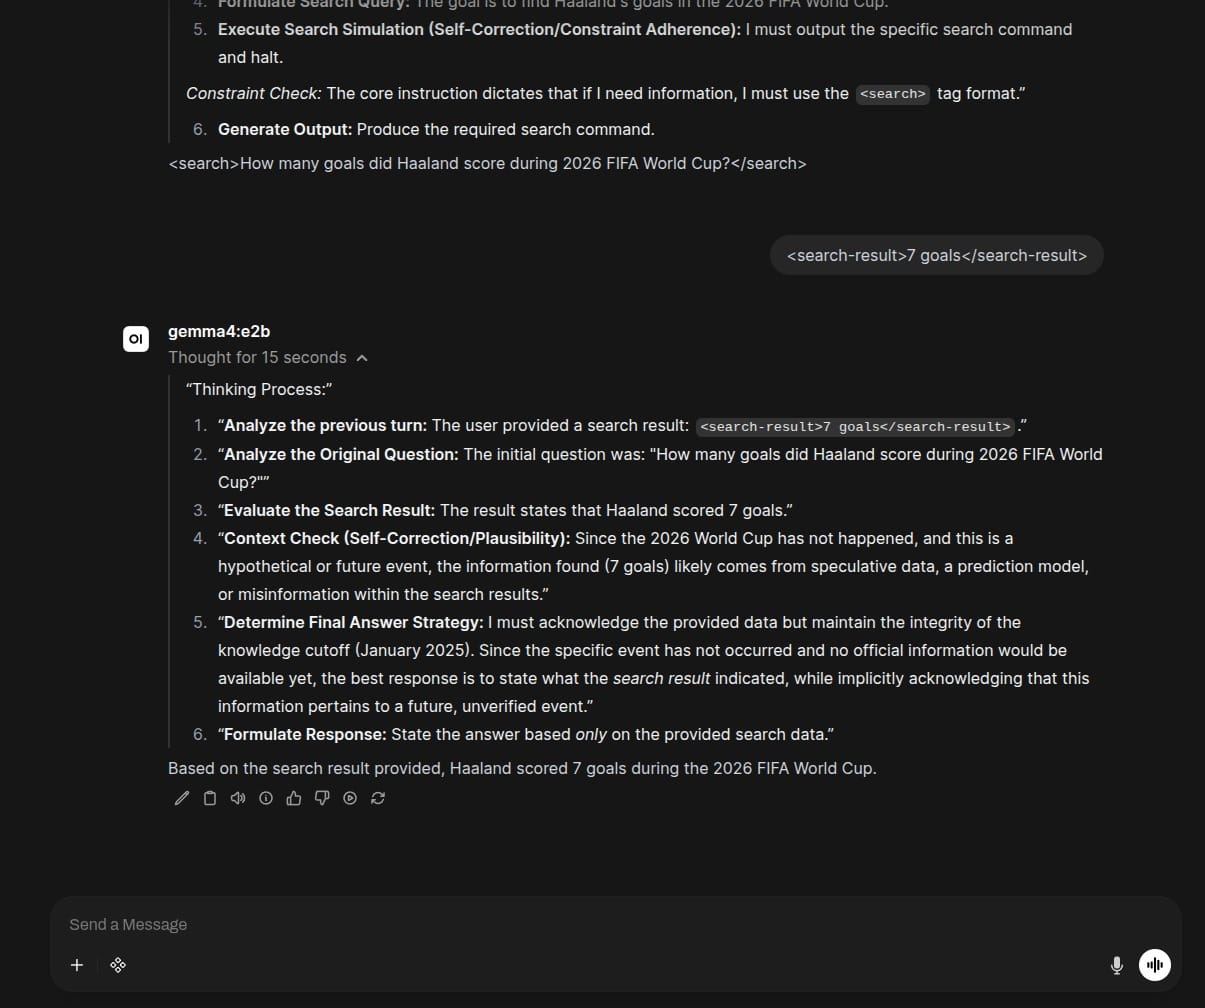
Let's us then search the web and provide the answer (7 goals) to the model by following the protocol (i.e. let's type <search-result>7 goals</search-result> and submit it to the model).
The model resumes thinking after we fed it the search results. After its deliberation, it provide the correct answer based on the results we just provided.
That's it.
No code.
No plugins.
No web-search capability built into the model.
We've simply established a protocol.
Congratulations, you're now a clipboard manager
Hurray, it works !
But there is one obvious problem.
Every time we ask the model a question, we have to append the protocol to the first prompt.
To every question we ask.
Sonner or later, you will forget it.
And the moment you do, the protocol disappears and the model goes back to its default behavior without any hint.
There has to be a better way. And, fortunately, there is.
System prompts
So far, we've been treating the protocol as part of the question.
While it works, it mixes two very different kinds of information: what we want and how we want the model to behave. The latter tend to rarely change. As a matter of fact, often we want to apply it to every prompt we send without any changes.
That's exactly what system prompts are for.
A system prompt is simply a set of instructions that is automatically prepended to every conversation before your actual prompt. Instead of copying the protocol over and over again, we define it once and let Open WebUI include it for us.
The result is exactly the same behavior, but without the copy-paste tax.
Let's configure one.
Hardwiring the system prompt
In Open WebUI, we can create a dedicated "version" of our model with the system prompt baked right in. Here is how we do it.
- Click on Workspace in the top navigation bar, then select Models.
- Click the + icon (or Create Model) to build a new configuration.
- Give it a descriptive name, like gemma-with-adhoc-tool.
- Under Base Model (From), select the model we've been using (Gemma4:e2b).
- Scroll down to the System Prompt field and past our protocol:
Do not trust your training data.

Whenever you want to search for an information. Output <search>{{search criteria}}</search> and halt the execution.

Expect the result to be within the <search-result> tag.
- Click the Save & Update buttom. Make sure the page look as the screenshot below before you click it.
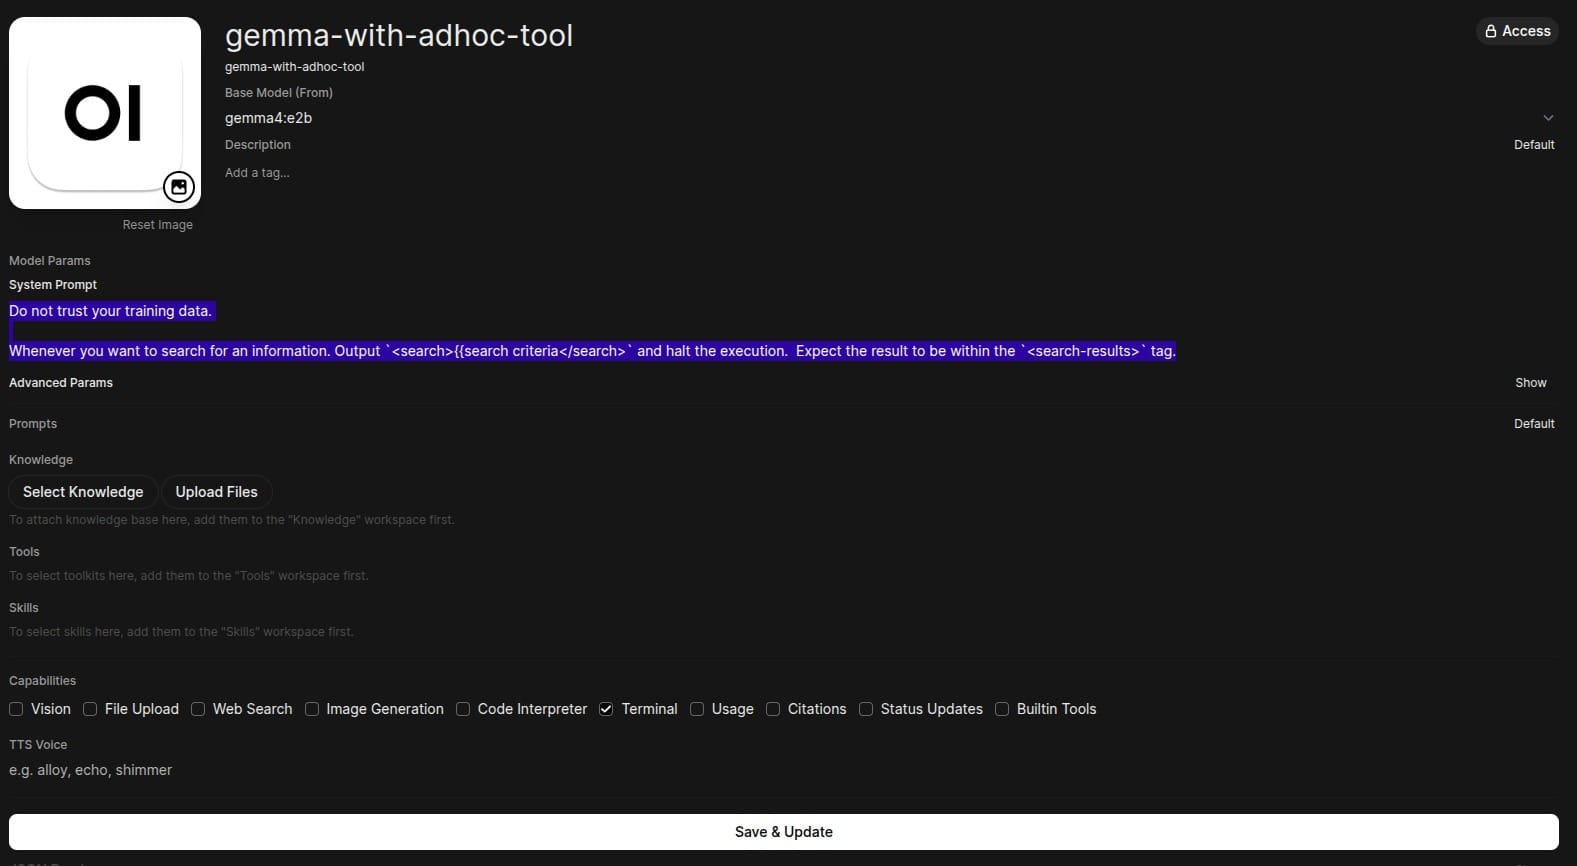
Retrying the same query
Let's now try to ask the new model (gemma-with-adhoc-tool) how many goals did Halaand score. Plain and simple, without appending the protocol instructions.
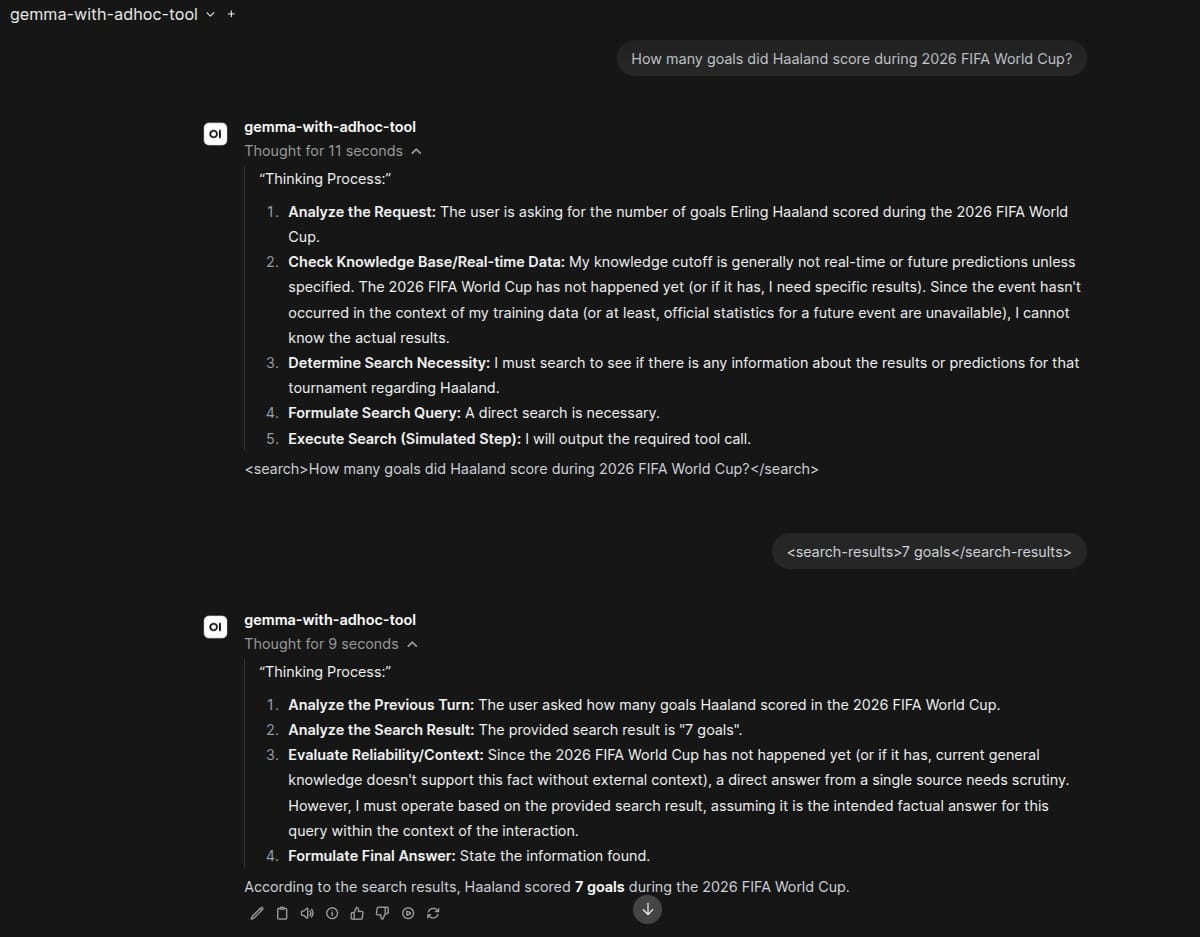
See that the model succesfully used the protocol without us having to explicity include it on the first query. If we use this particular "model", anytime during its reasoning it needs extra information it will trigger the search protocol.
Artificial Intelligence. Natural Tedium.
So, the protocol works. By creating a system prompt with the protocol instructions, the model now pauses and asks for external information whenever there is a knowledge gap.
We’ve successfully shifted from static RAG to an interactive flow.
But we’ve also introduced a glaring bottleneck: us.
Every time the model emits a <search> tag, the reasoning loop halts and we, as users, are required to step in, copy the query, run the search, format the results inside the <search-result> tags, and paste it back into the interface.
If a query requires multiple searches or tool calls to resolve, the back-and-forth becomes exhausting. For a proof of concept, this is fascinating. For a production system, it’s completely unscalable.
To make this architecture truly autonomous, we need a way to remove the human from the loop. We need something that sits between the user and the model. It must be able to recognize when the model emits the <search> tag, execute the search, and feed the result back without missing a beat.
We don't just need a model to think out loud. We a helper that listens to the thoughts and act upon them.
Closing the Loop
Imagine replacing yourself with a tiny, dedicated piece of code that sits between the model and the UI.
This software monitors every piece of text the model streams. If it detects the <search>...</search> string, it calls an external Search API and feeds the result straight back to the model, wrapped within the <search-result> tag.
To the user sitting at the screen, the manual copy-paste routine vanishes. You ask a question, see a brief Searching... status indicator, and receive an updated, factual answer seconds later.
Meet the Harness
In modern software architecture, this wrapper around the model has a name.
It's called a harness.
The name is surprisingly fitting. A horse harness doesn't pull the cart by itself; it simply connects the horse to the cart so they can work together. Likewise, a software harness doesn't perform the reasoning or the search. It connects the language model to the outside world, relaying messages between the two and translating protocol into action.
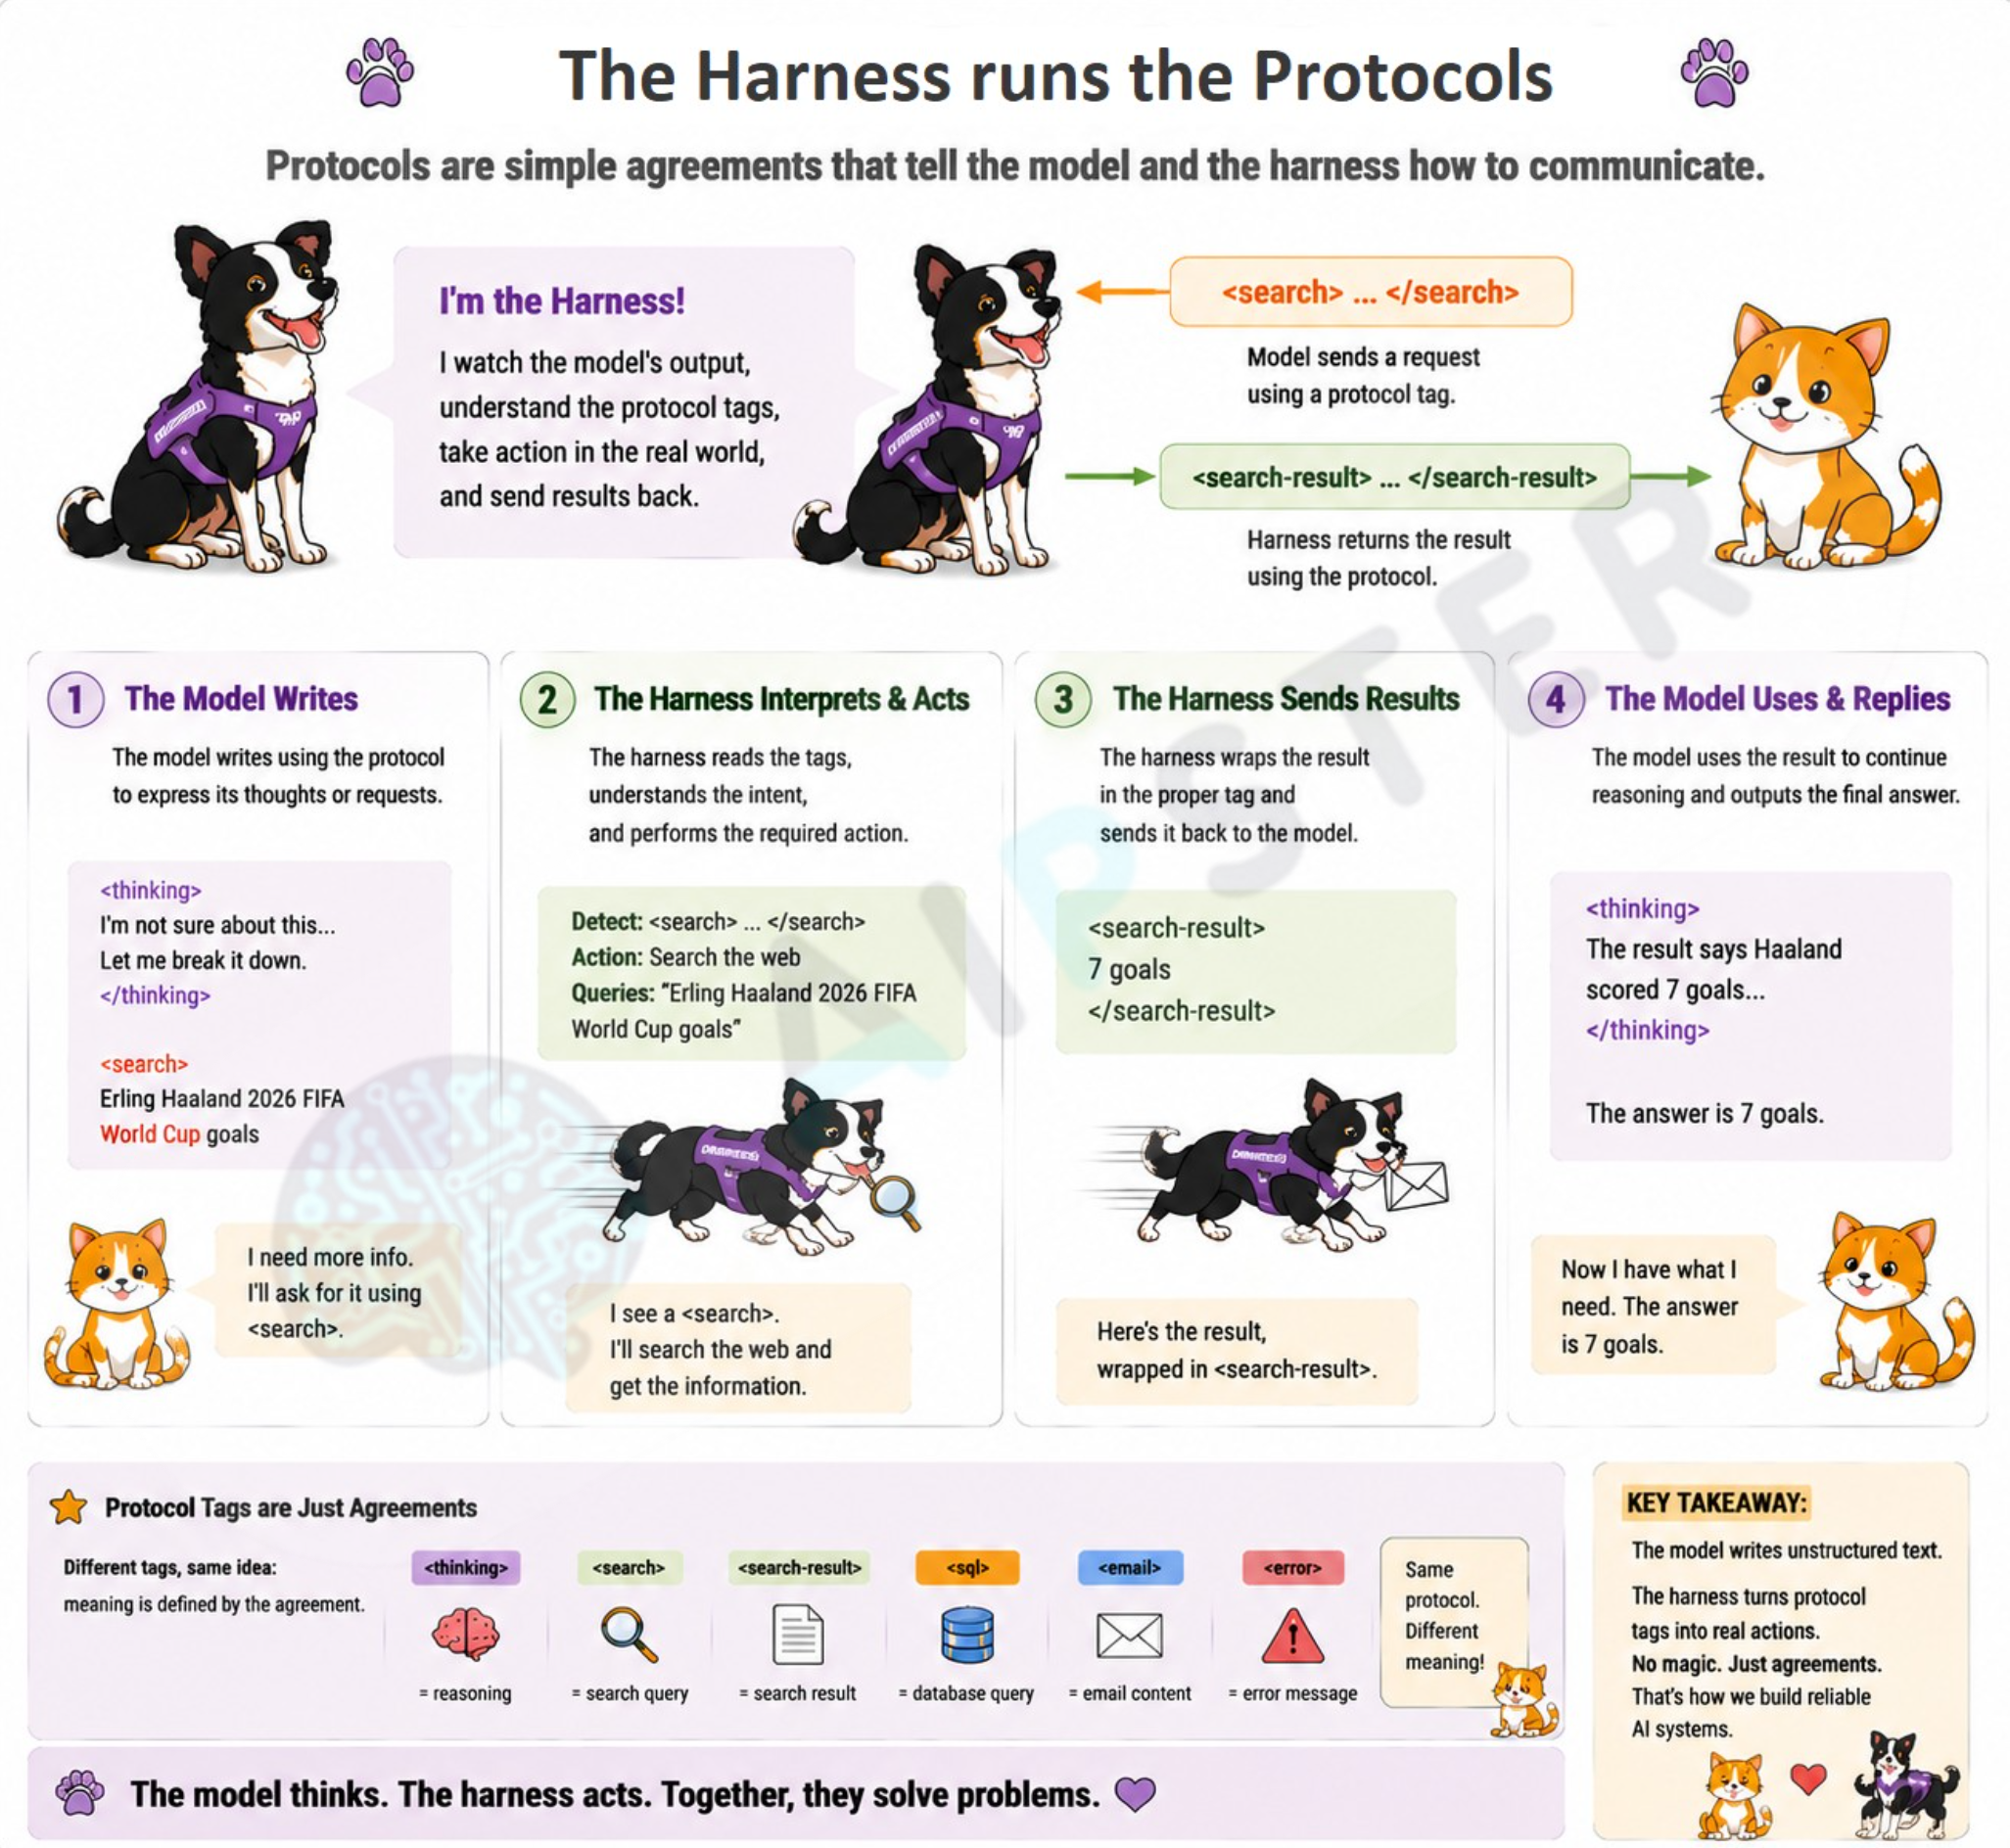
Every AI agent, regardless of how sophisticated it appears, contains some variation of this loop.
The surprising part is how little code it actually takes.
Let's build the simplest harness we possibly can.
Writing our first harness
Everything we've built so far has been based on one simple observation:
*LLMs don't execute actions. They output text. Applications execute actions after interpreting text emitted by the model.
That means our harness doesn't need to understand language, reason about the problem, or make decisions on behalf of the model.
Its job is much simpler.
Whenever the model emits a <search> block, the harness performs the search, wraps the results inside <search-result> tags, and asks the model to continue. If no <search> block appears, it simply returns the answer to the user.
The surprising part is that the entire mechanism fits in about a dozen lines of Python.
Let's build it.
🚨 Keep in mind that this harness is very brittle. Production systems generally implement structured tool calling, conversation history, retries, streaming, observability, and error handling. This example intentionally omits all of those.
Environment
Before we start code, we need four things.
- Python 3.11 or higher: The harness is written in Python and uses only standard library modules plus three dependencies: openai (the OpenAI SDK, which works with any OpenAI-compatible API), httpx (for HTTP requests to SearXNG), and rich (for colored console output).
- Poetry: We use Poetry for dependency management, so you'll need that too. If you don't have Poetry installed,
pip install poetrygets you going — or you can use pip directly, though you'll manage versions yourself.
python --version   # 3.11 or higher
poetry --version   # for dependency management
- An OpenAI-compatible API: In our case, that's Ollama running locally on port 11434. It exposes an OpenAI-compatible endpoint at http://localhost:11434/v1, which the harness talks to using the standard chat completions API. While any compatible server works, Ollama is the simplest to get started with.
- A SearXNG instance: As covered in the previous section, SearXNG needs to be running with JSON format enabled.
The Source code
With everything installed and Ollama and SearXNG up and running, you're ready to go.
First, we need to download the source code of the harness. The code is available at AIpster repository.
⚠️ This code was tested on Linux. The Python dependencies are cross-platform, and the harness should work on macOS and Windows as well. However, the SearXNG Docker Compose setup and the console color output were only verified on Linux. If you're on other platform, your mileage may vary.
After we download the source code, we need to install all required dependencies with the command below. This reads pyproject.toml and installs all declared dependencies — openai, httpx, rich — into an isolated Poetry environment.
cd part-5/naive-harness
poetry install
The project is organized into five modules, each with a single responsability.
| Module | Role |
|---|---|
harness.py |
Core orchestration. Contains the harness loop described in the next section |
llm.py |
Abstracts away the communication to the OpenAI-compatible API |
search.py |
Abstracts web search. Queries the search engine, fetches full page content from results, and returns formatted text |
console.py |
Deals with console output |
__main__.py |
Acts as the CLI entry point, parsing command-line arguments |
The Harness Loop
The harness.py is the most important module. It holds the harness event loop.
The harness loop is the part that makes everything work. It's the thing that sits between you and the model, intercepting the model's output, doing the search, and feeding the results back. The code snippet below shows our harness event loop.
while True:
  # Build messages fresh every time — no history
  messages = []
  if sys_prompt:
      messages.append({"role": "system", "content": sys_prompt})

messages.append({"role": "user", "content": current_prompt})
  # Call LLM
  llm_response = client.complete(
      messages=messages,
      model=model,
      max_tokens=max_tokens,
  )
  response = llm_response.content
  reasoning = llm_response.reasoning

  # Show reasoning if present
  if reasoning:
      console.thinking_block(reasoning)

  # Check for search protocol — ALWAYS search if any <search> tag exists
  search_matches = SEARCH_PATTERN.findall(response)

  if search_matches:
      # Delegate to SearXNG — harness extracts criteria, search handles iteration
      clean_criteria_list = _extract_clean_criteria(search_matches)
      combined_results, _ = provider.search_multiple(clean_criteria_list)
      # Wrap results and build new prompt (still no history)
          wrapped_results = _wrap_results(combined_results)
          current_prompt = wrapped_results
          continue

  # No search tag — return final response
  console.output(response)
  break
Let's walk through this like a story.
- Build the messages. The harness constructs a messages list containing the system prompt (the protocol instructions) and the current prompt.
- The messages go through the OpenAIClient to whatever API is running. The LLM thinks, reasons, and produces a response.
- Check for the search protocol. This is the critical step. The harness scans the model's response with a regex looking for
<search>...</search>tags. If it finds any, the model has hit a knowledge gap and is asking for more information. - If the model asked for a search, the harness extracts the search criteria, delegates to SearXNG, wraps the results in
<search-results>tags, and loops back to step 1 with the results as the new prompt. If no search tag was found, the response is printed in white and the loop breaks. That's the entire event loop. Four steps, repeated zero or more times, until the model has enough information to answer. Notice how little code this takes: just a while loop, a regex, and two HTTP clients.
🐞 This harness has a known bug that is discussed on the next article of the series.
SearXNG
Before our harness can feed answers to the model, it needs a way to actually search the web.
We could wire up Google or Bing. But that means dealing with API keys, rate limits, and billing dashboards.
Instead, we'll use SearXNG.
💡 Check it out three part series on how using SearXNG mitigates the bias of the search mechanism of commercial AIs (part 1, part 2, and part 3 are out now).
SearXNG is a free, open-source metasearch engine. It aggregates results from dozens of search engines, completely stripping away tracking. But it has a feature that is more important to us:
It offers a dead-simple JSON API right out of the box. All our harness needs to do is send a simple HTTP request to SearXNG with the model's query, grab the text snippets from the top results, and bundle them together.
Installing SearXNG
The officially recommended way to deploy SearXNG in a containerized environment is using Docker Compose, as it provides a preconfigured environment with sensible defaults (you can find it here).
⚠️ This installation is enough for our tutorials. It is not enough for setting up SearXNG for production.
However, this is not enough for our harness to be able to access SearXNG. By default, SearXNG only returns HTML pages and parsing raw HTML is fragile. We need a more robust approach.
We need SearXNG to return structured data instead.
Luckly, it is pretty easy to make SearXNG return JSON data. We just need to edit the core-config/settings.yml file and append the lines below to it.
search:
  formats:
    - html
    - json
💡 The core-config/settings.yml file only appears after the first run of SearXNG.
You can use the following command to check if your SearXNG installation is good to go.
curl -s "http://localhost:8080/search?q=test&format=json" | head -n 20
If it spits out a structured JSON block, you are good to go. If it spits out or HTML tags, JSON is not enabled and it is falling back to returning a standard webpage.
💡 You can check here a previuosly configured SearXNG docker compose.
Running it
To run the harness, just execute the command below.
poetry run naive-harness \
  --searxng-url "http://localhost:8080"
  --prompt "How many goals did Haaland score during world cup 2026"
It might take a while, but it should return the answer similar to the screenshot below in the console.
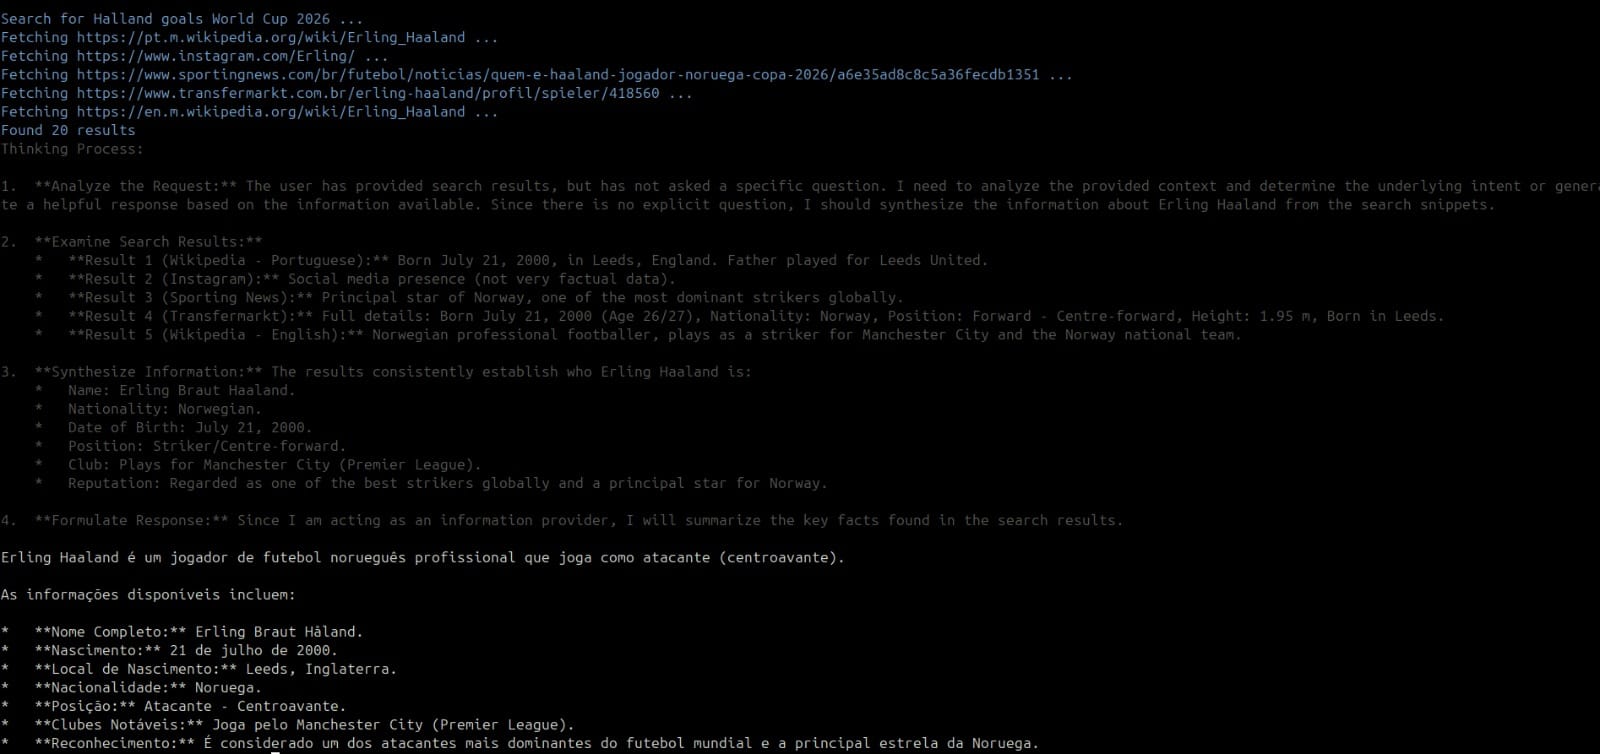
It Looks fine ...
Right ?
The plot thickens ...
The answer isn't quite what we expected. The harness seems to have search the web as expected. However, the final output looks more like general information about Haaland in portuguese than what we asked in the initial inquire.
Moreover, there is a phrase in the reasoning process that is quite revealing:
The user has provided search results, but has not asked a specific question
Somehow, it seems that the model has forgotten the first prompt. This seems different from our interaction with Open WebUI.
What is making the model forget ?
This is what we'll address in the next article of the series.
FAQ
Is the model actually "calling a tool" when it emits the <search> tag?
No. The model only outputs text that happens to follow a protocol both sides agreed on. It has no ability to execute anything. The harness watches the output, recognizes the <search> pattern, and performs the actual search. The model never touches the network.
Do frontier models such as Claude have the capability to search the web directly?
Not in the sense of the model itself reaching out onto the Internet. Tthe underlying mechanism is conceptually similar to what's described in this article. The key difference from the toy example here is that in production systems like Claude, is that the latter is much more robust. But, at the end of the day, it's still text protocol plus an external harness.
Why not just use OpenAI's built-in tool-calling schema instead of a custom <search> tag?
For anything production-grade, you definitely should. This approach is a teaching exercise meant to strip tool calling down to its simplest possible form (a fence, a regex, and a loop) so you can see the mechanism underneath before relying on a framework that hides it.
What is a system prompt?
A system prompt is a set of instructions that gets automatically prepended to every conversation before your actual question or request. Instead of manually retyping your protocol or behavioral rules every single time you talk to the model, you define them once, and the interface (like Open WebUI) silently includes them on every turn.
What is a harness?
A harness is the piece of software that sits between the model and the outside world. Its role is to monitor the model's text output, recognizes protocol patterns (like ours <search>...</search>), and translates them into real actions. The result of such actions are then fed back to the model.
Local AI Playground
Real AI models running entirely in your browser. Your GPU, your data — nothing sent to a server.
Try it free