The power of LLama - Part 2: From terminal to a ChatGPT style chat
Ready to take your local LLMs beyond the terminal? Discover how to upgrade your workflow with Open WebUI, a self-hosted browser interface providing chat history, rich formatting, and easy model switching. Finally, we dive into the theory of tokens, embeddings, and new multimodal models like Gemma 4.

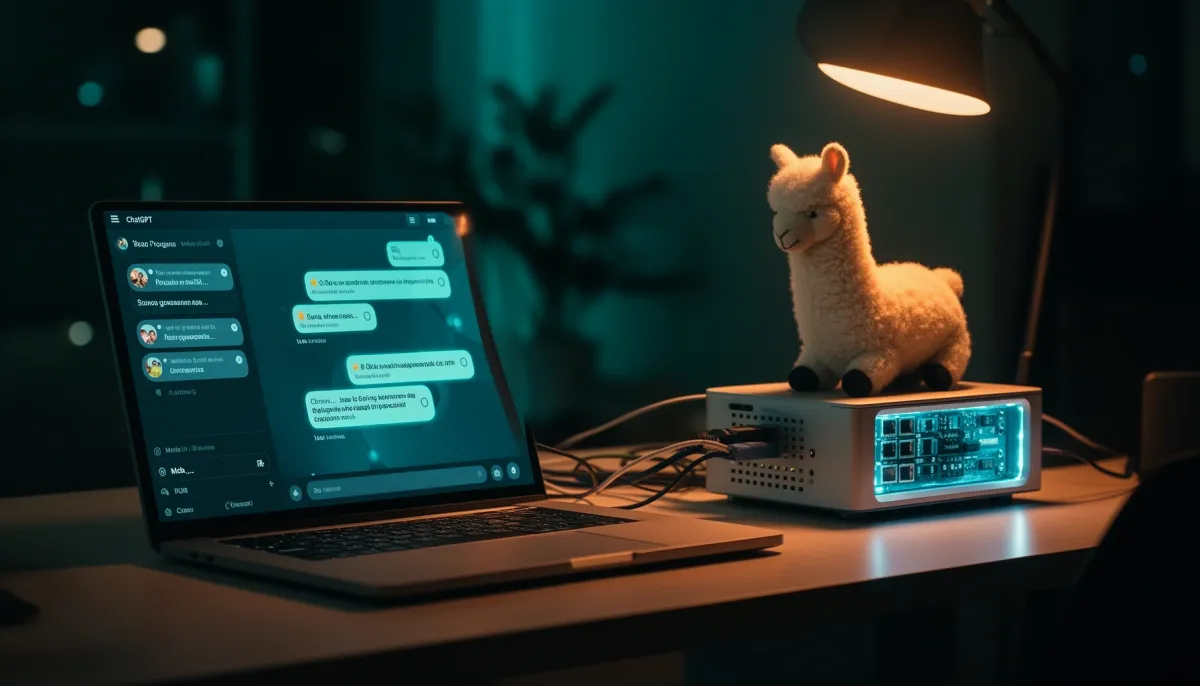
This is the second weekly post in a series on running large language models locally. Do not forget other installments of the series:
In the last post, we understood a little bit of the theory behind LLMs and got to run our very first instance of a model using ollama.
You might be wondering:
This works, but it's not how I actually use an LLM.
And you would be right. While the CLI (aka the terminal client) is one of the first things everyone tries, it falls apart the moment you want to do real work. For instance it won't give you:
- Conversation history. You close the session and bang, it's gone. You can't go back to that nice answer the model gave you yesterday.
- Sensible model switching. Changing models means quitting one process and starting another one. You have to remember exactly what model you've pulled and what is its name.
- Formatting. Code blocks, tables, and Markdown render as raw text. Long answers become a wall of text.
None of this means the CLI is broken. It just means it wasn't built for the back-and-forth you do when an LLM is part of your actual workflow.
The better setup is a browser interface that keeps your chats, shows your models in a dropdown, and renders answers the way you'd expect.
Open WebUI has entered the chat
Open WebUI is a self-hosted web interface for LLMs. If you've used ChatGPT, the layout will feel familiar: a sidebar of past conversations on the left, a chat window in the middle, a model selector up top.
The key detail is that it runs entirely on your hardware. Your data will never leave the machine. It connects to Ollama (or any other inference engine) through the same API that the CLI uses under the hood, so nothing about your models changes. You're just putting a usable front end on top of them.
Prerequisites
Before proceeding to installing Open WebUI, it is worth check if the following pre-requisites are met.
1. Docker installed
This guide assumes that you have Docker installed on your machine. If you need guidance, here is some information to help you setup Docker (Windows, Mac, and Linux).
2. A running Ollama instance
Make sure Ollama is installed and running first. You can confirm with:
ollama list
If that prints your downloaded models, you're good. If not, refer to the 1st part of this series.
3. Ollama instance accepting inbound traffic
It is paramount that the Ollama instance accepts inbound traffic. You can check that by pointing your browser to the url http://<server-ip>:11434/ where server-ip is the IP of the computer running ollama. If that prints Ollama is running, then everything is set up. Otherwise, check this article that shows how to make ollama listen to inbound requests out.
TL;DR; You must set the
OLLAMA_HOSTenvironment variable to0.0.0.0to make Ollama listen to inbound traffic.
Installing Open WebUI
Open WebUI installation is done by a single Docker command stated below.
docker run -d \
  -p 3000:8080 \
  --add-host=host.docker.internal:host-gateway \
  -v open-webui:/app/backend/data \
  --name open-webui \
  --restart always \
  ghcr.io/open-webui/open-webui:main
💡 The
--add-host=host.docker.internal:host-gatewaystatement is only necessary when running on Linux.
Give it a minute or two for the engines to warm up, then open http://localhost:3000 in your browser.
First Launch and Account Setup
When you open the browser, you will be greeted by a welcome screen. Click the Get started link down below. You'll be asked to create an account. This account is local to your install, not a cloud login. The first user you create becomes the admin.
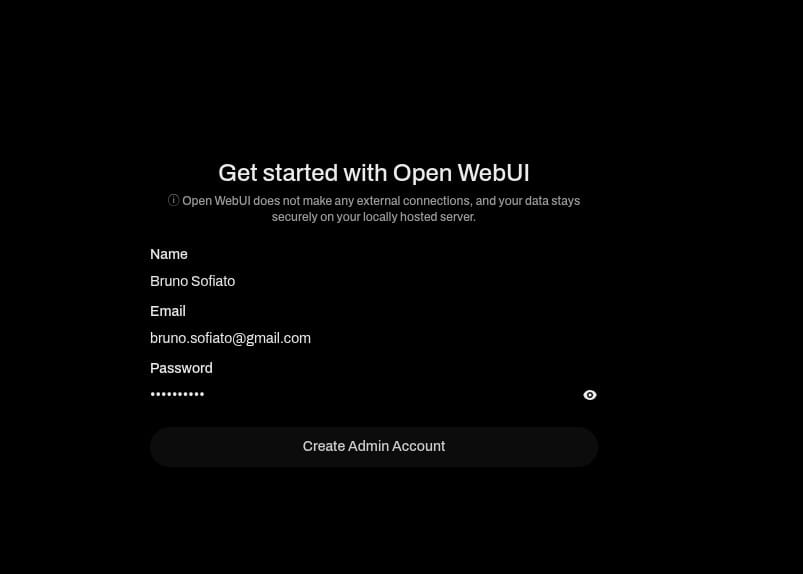
If you're the only person using it, this is a five-second step. If you're running it for a small team, the admin account is who manages model access and user permissions later.
⚠️ Make sure you pick a email and password you'll remember, because there's no reset email going anywhere.
Connecting Open WebUI to Ollama
Most of the time, Open WebUI finds Ollama automatically. The Docker command above gives the container a route to your host, and Open WebUI checks the default Ollama address on its own.
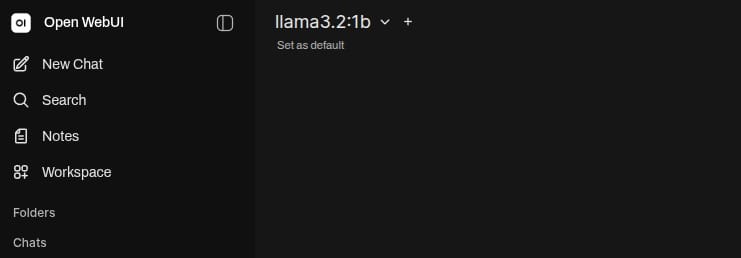
You can check if Open WebUI has found Ollama by looking at the main screen. If it shows the llama3.2:1b model on the model drop down (located on the top of the screen you're good to go. Otherwise, you'll have set the connection manually:
Manually connecting Open WebUI to Ollama
- Click on Your Profile icon on the bottom left of the sidebar;
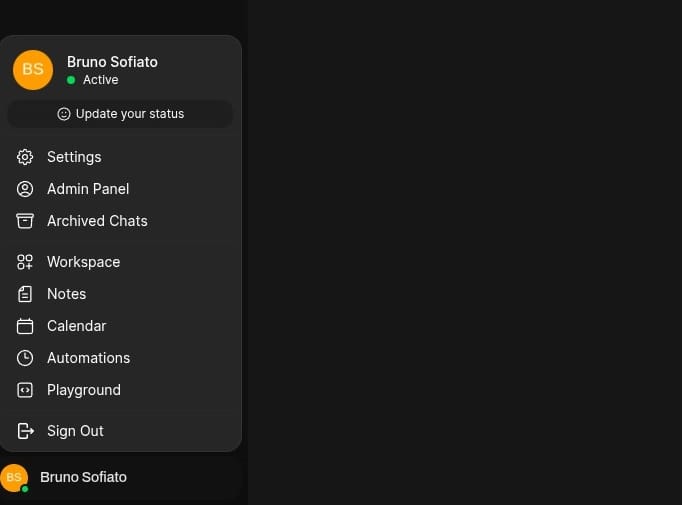
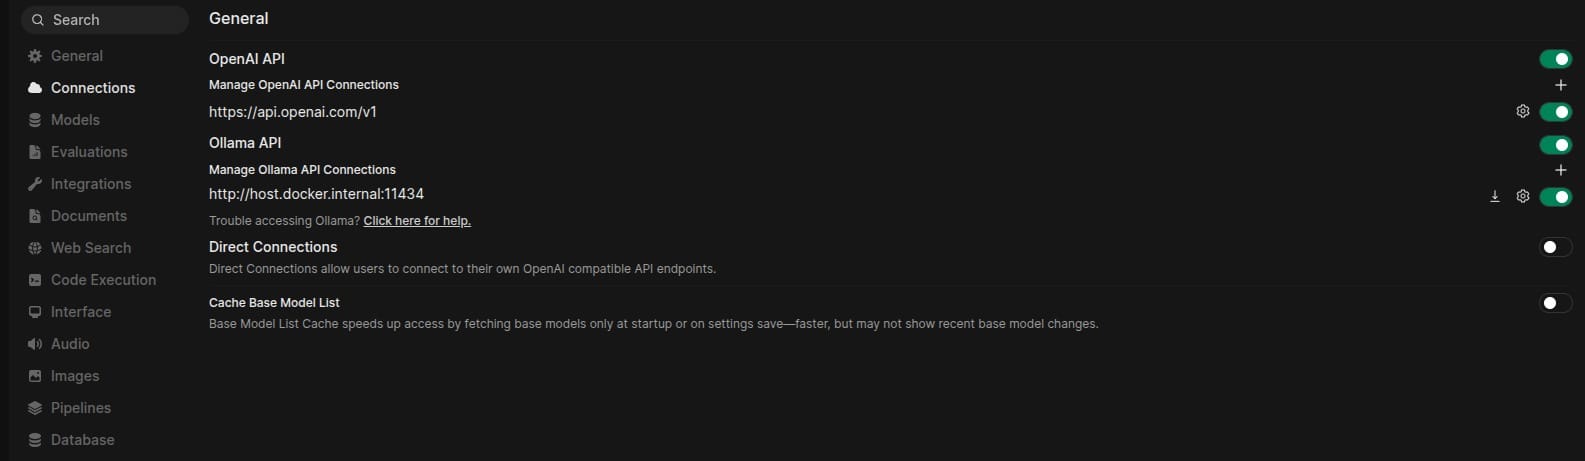
- Click on Admin Panel, then Settings, then Connections on the side menu. This will open an panel with the Open WebUI connection settings.
-
Look for Ollama API section on the panel. There should be an entry named Manage Ollama API Connection. It should read
http://host.docker.internal:11434. If it doesn't, click on the Configure button (the button whose icon is a gear); -
You'll be greeted by the Edit Connection screen. In that screen, set the API URL to
http://host.docker.internal:11434and the connection type toLocal. You shouldn't need to change any other settings.
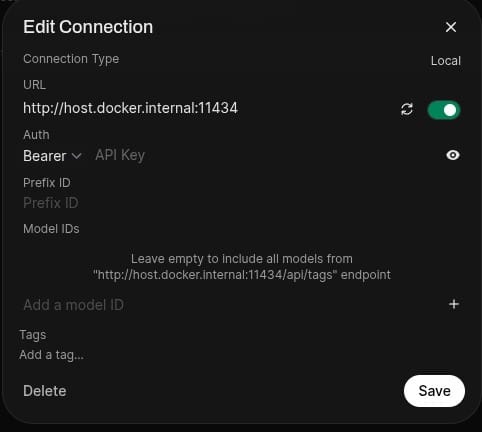
- Save, then reload the page.
If the connection is correctly set up, your model dropdown fills with whatever you've pulled through Ollama. No extra config needed.
💡 The
host.docker.internalis a special host inside a docker network that points to the host (the actual computer running docker) whereas the port -- 11434 -- is the default Ollama API endpoint. Everything Open WebUI does talks to that address. If you ran Open WebUI without Docker, the URL is simplyhttp://localhost:11434instead.
Starting Your First Chat
Click New Chat, pick a model, and type. That's the whole flow.
The difference is immediate. Code comes back in proper blocks you can copy with a single click. Tables render as tables. Long responses are now readable instead of a stream of wrapped text.
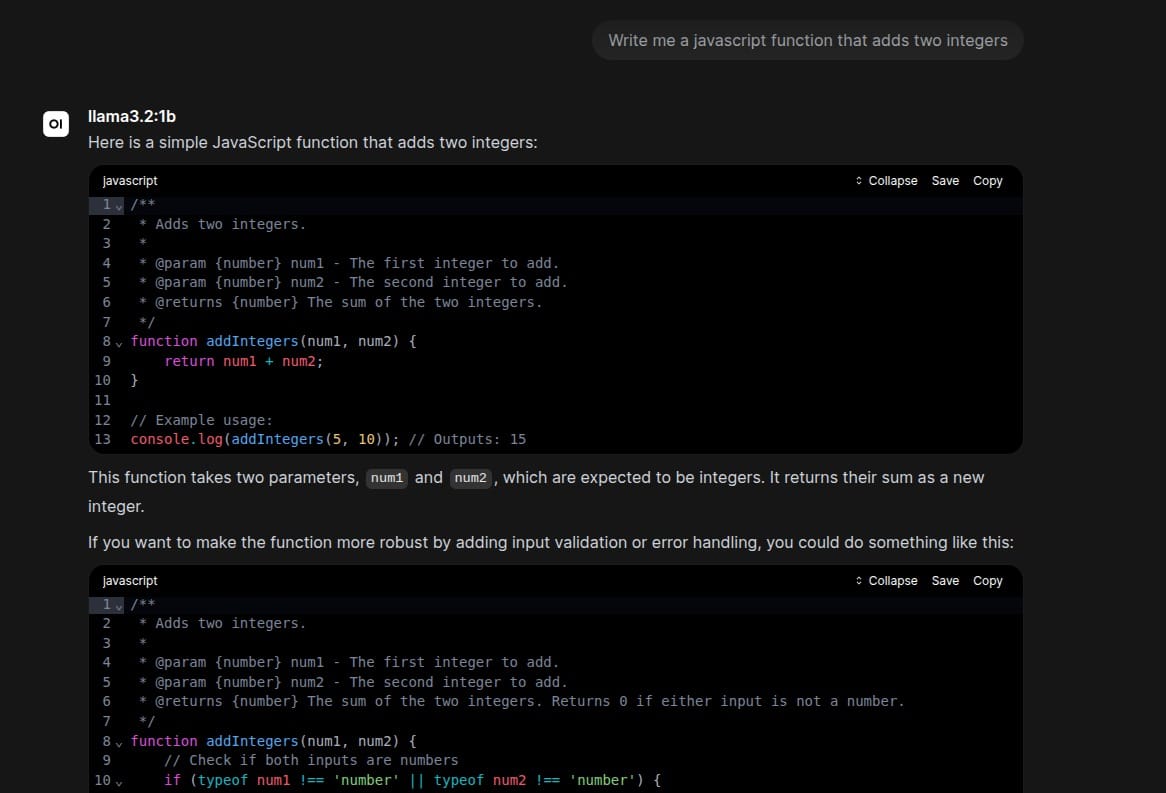
It is worth noting that the first response on a fresh model may take a while. This is due to the fact that the model is being loaded transparently in the background. Afterwards, each response will be as fast as your hardware allows -- exactly the same speed you'd get from the CLI.
Conversation History That Sticks Around
Take look at the left sidebar. Every chat you start is included there automatically. You are one click away from restoring any of those. All the inquiries and their answers. Everything.
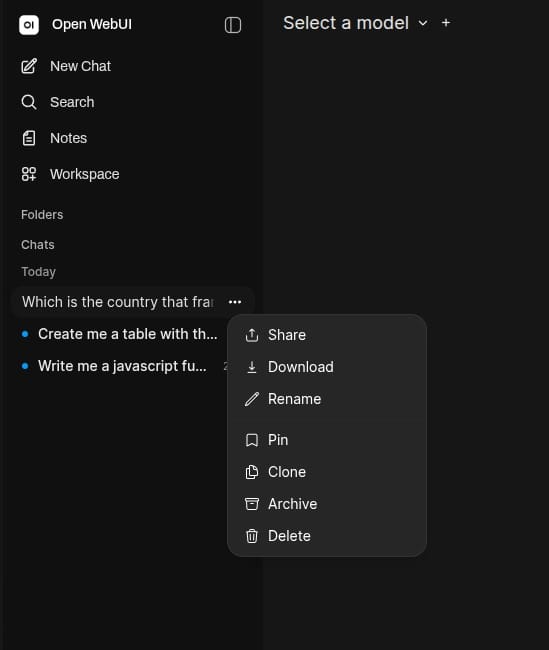
This sounds basic, but it changes how you work. That long debugging session from Tuesday is still there Thursday. You can rename chats, organize them, search across them, and delete the ones you don't need.
Better yet, your data lives in the Docker volume from the install step, your history survives restarts and updates. That volume lies on your own machine, not a server in the cloud. You can back that volume up and to back everything up: chats, settings, and accounts.
Your data, your rules.
This is one of the biggest differences between chatting with an LLM as a toy and using one as a productivity tool. Over time, your history becomes a valuable knowledge base that grows alongside your projects. Since you own the data, you can control how and where it is backed up.
Adding a Picture
Modern installments of LLMs such as ChatGPT allows us to ask questions about PDFs, pictures and other kind of media.
Open WebUI provide us the same functionality. Let's try using it by attaching the picture below to the chat.
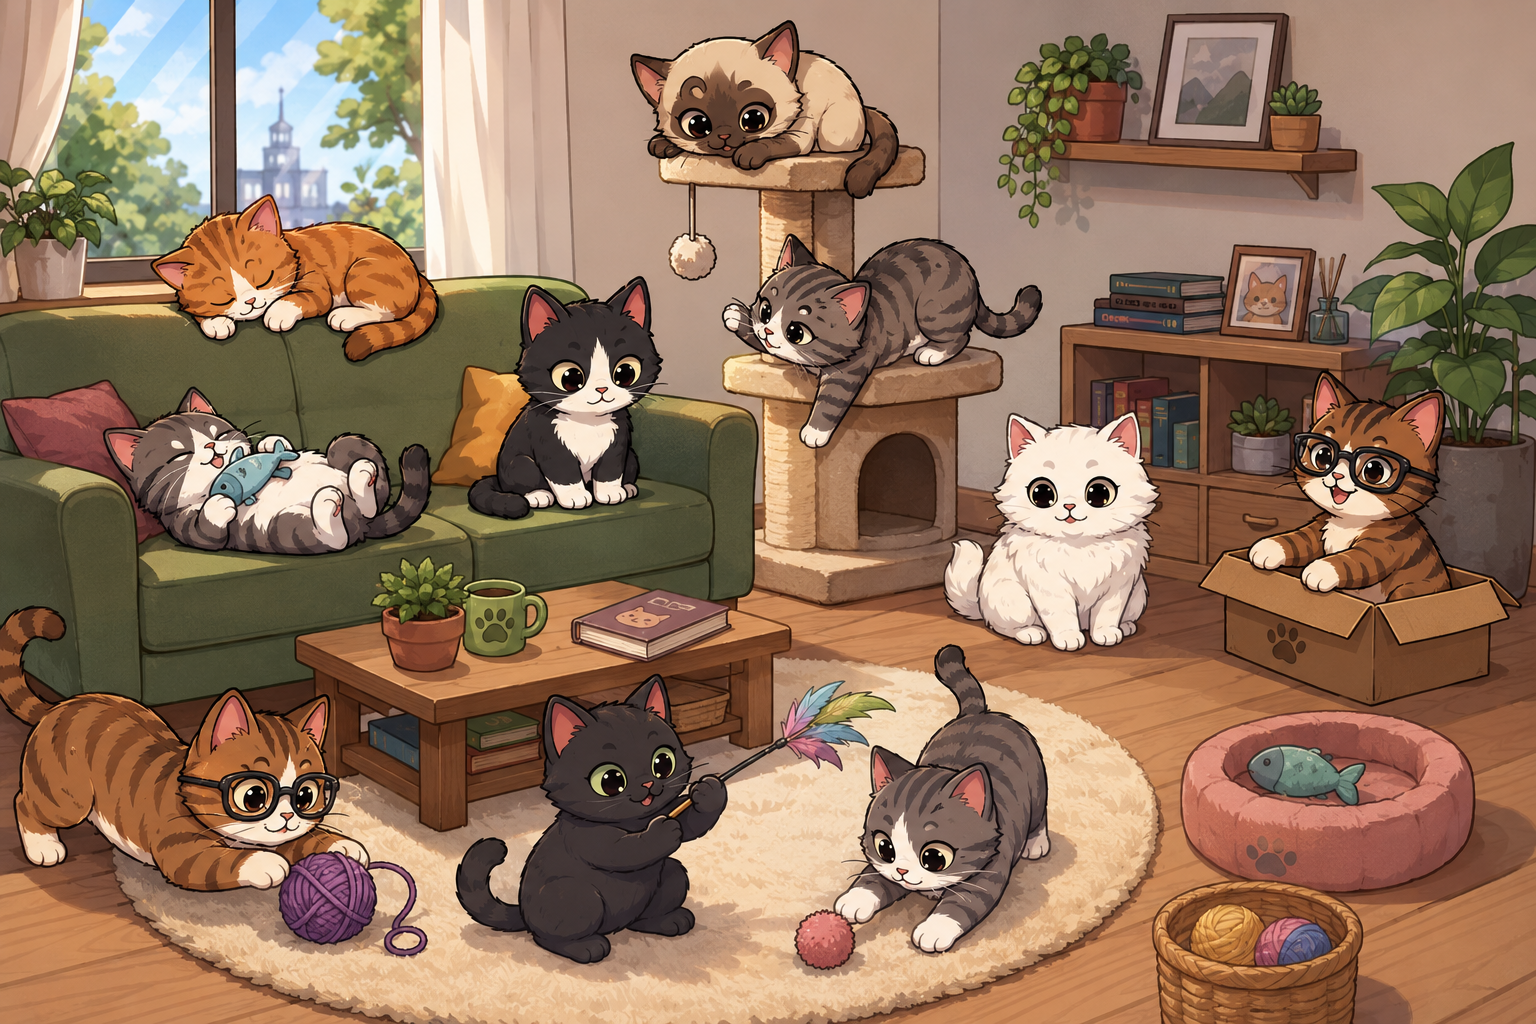
💡 You can copy-and-paste an image in the Open WebUI text box, the same way you can do that in ChatGPT.
When asking the model to describe it, we are greeted by the following error message:
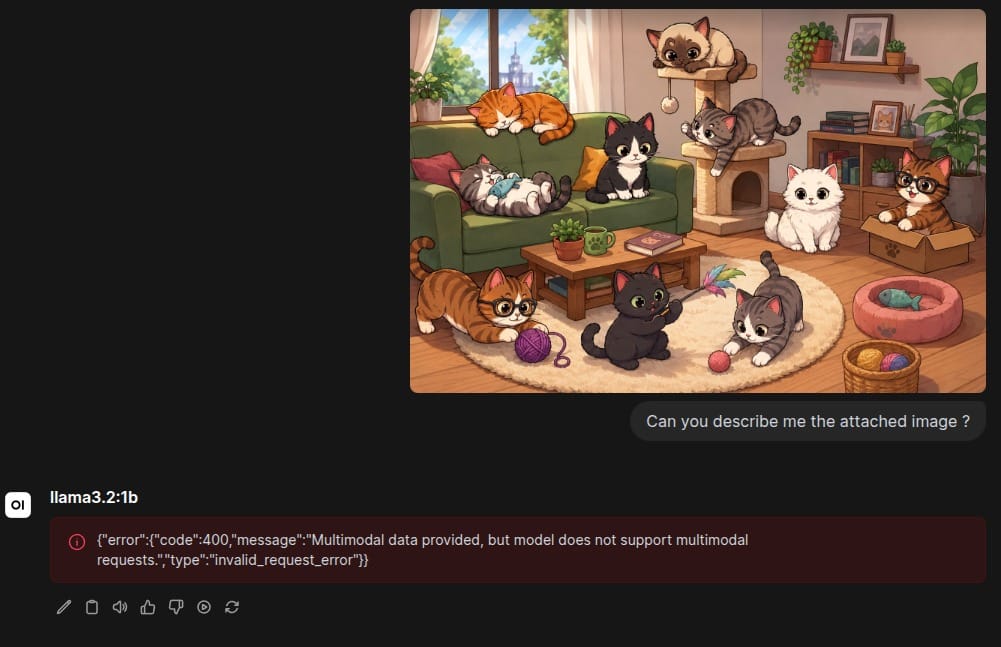
What gives?
Model Modality
💡 This section will delve into LLM's theory.If you just want to get the image working, skip ahead to the Switching Models section. If you want to understand why it failed, read on.
The error message looks alarming, but the reason behind it is simple. The model we used -- llama3.2:1b -- is capable only of processing a single modality (think of modality as media type). In this case, the model is only capable of processing text.
We call this a unimodal model.
There is another class of models which are capable of processing multiple modalities simultaneously (e.g. image and text, text and sound, etc.). We call models that are not bound to a single modality a multimodal model.
The Moment "Words" Stop Making Sense
If you paid attention, I have refrained from using the word tokens, choosing to use words instead.
Until now.
Understanding how a multimodal model "sees" our image and correlate it to a text brings us to a fundamental realization about how these engines actually process information.
We often talk about LLMs "reading" our prompts, but that is a human-centric abstraction. At the architectural level, these models don't process words, and they don't process pixels.
They process tokens.
Whether it is a sequence of characters from your keyboard or a patch of pixels from an image, the model’s first job is to encode that input into a numerical representation it can manipulate. To truly understand how this works, we pop up the hood and look at how the model actually "sees" the world—and why the difference between a word and a token is the single most important concept you need to grasp to optimize your own LLM workflows.
Meaning as a point in space
Imagine a massive, invisible map with thousands of dimensions. Concepts are mapped inside this space in such way they are closer to each other when they are semantically similar (cat would be mathematically closer to dog than to it is to airplane).
In other words, concepts become points in this space. As points, they can be translated as coordinates in this multi-dimensional space. When your text is split into tokens, each token is mapped to a point in this multidimensional space. The coordinates of that point are called an embedding.
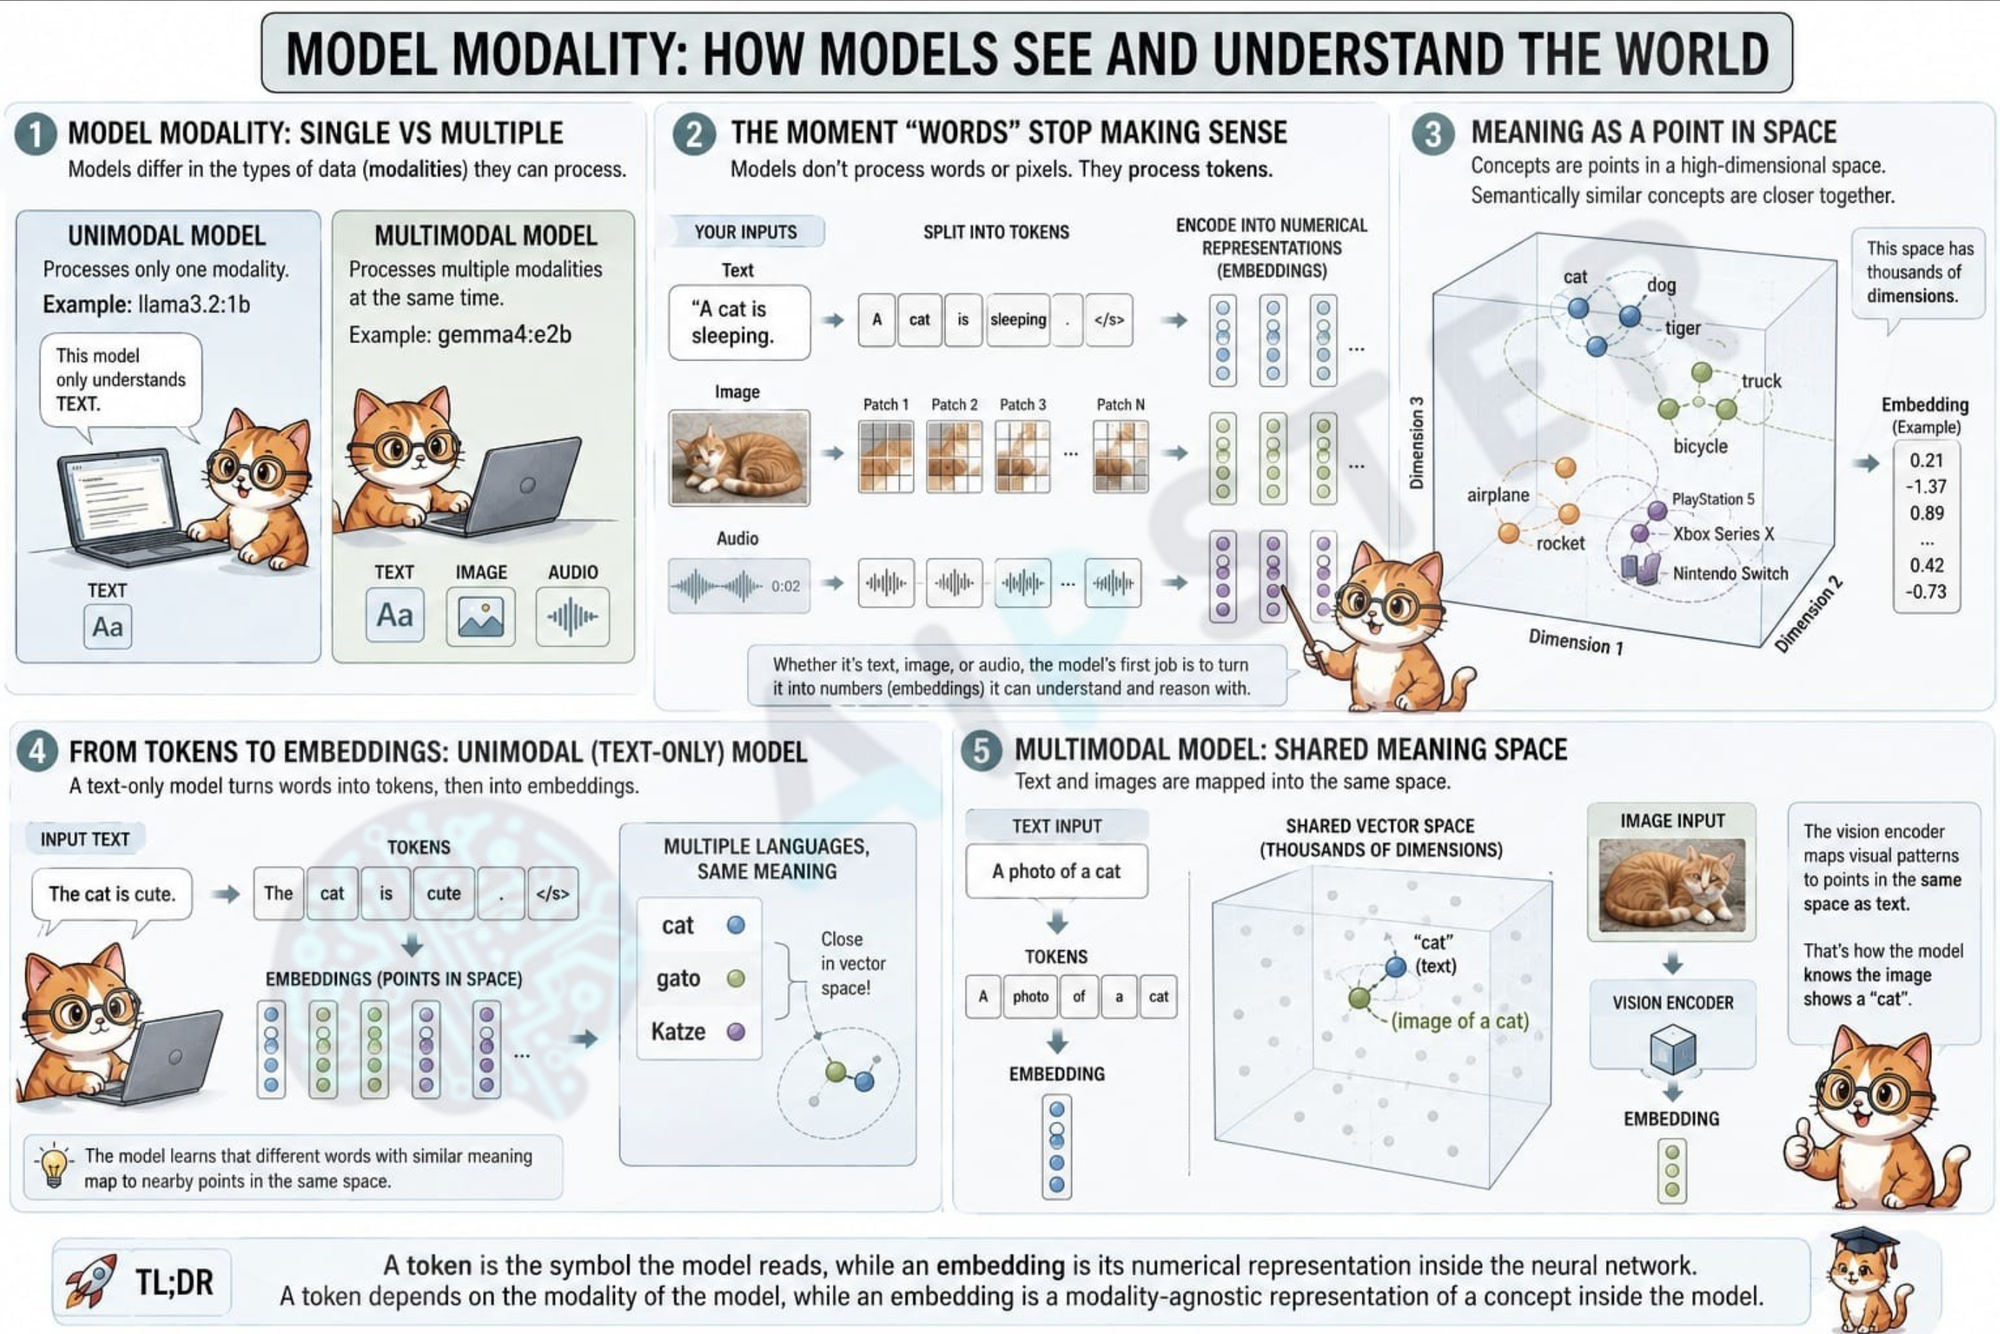
A unimodal (text-only) model only knows how to process text. It first splits the input into tokens, then converts each token into an embedding. If the model has been trained on multiple languages, words such as cat, gato, and Katze will result into tokens whose embeddings lie close to one another.
In a multimodal model that knows how to "see" images, we have trained a vision encoder to map visual features into that exact same coordinate system. When you upload an image, the encoder identifies visual patterns that resemble a cat and encodes them as a point in the vector space close to that of the word cat.
TL;DR; A token is the symbol the model reads, while an embedding is its numerical representation inside the neural network. A token depends on the modality of the model while an embedding is a modality agnostic representation of a concept inside the model.
Switching Models
Let's search for a model that is capable of vision on ollama. A good candidate for such a model is Gemma 4. Gemma 4 is a open-weight model released by Google DeepMind laboratory (the same laboratory responsible for Gemini). Besides being a strong general-purpose model, Gemma 4 is multi modal -- it processes text, image, and audio --, making it a perfect replacement for the text-only Llama model we've been using so far.
⚠️ Keep in mind that, in spite of being a relatively small model, Gemma is considerably larger than the version of Llama we've been using (it takes about 8GB of disk space). Depending on your hardware, it can also run a little bit slower.
Downloading Gemma 4
Open a terminal and ask Ollama to download the model:
ollama pull gemma4:12b
Like any other package manager, Ollama downloads the model only once. After that, it stays on your machine until you explicitly remove it.
The download may take a few minutes depending on your Internet connection. Once it finishes, verify that the model is available:
ollama list
You should now see both models installed:
NAME
llama3.2:1b
gemma4:12b
Switching Models in Open WebUI
Return to your browser and click the model selector at the top of the conversation.
You should now see Gemma 4 alongside the Llama model we installed earlier.
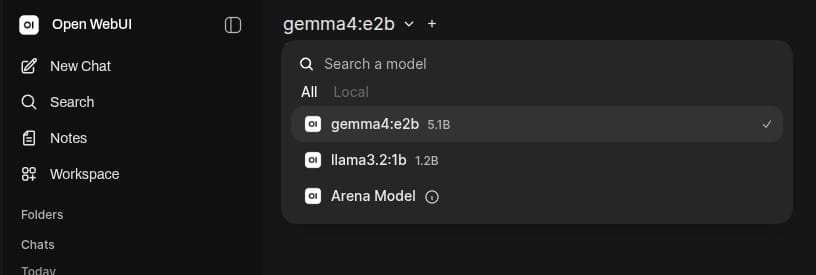
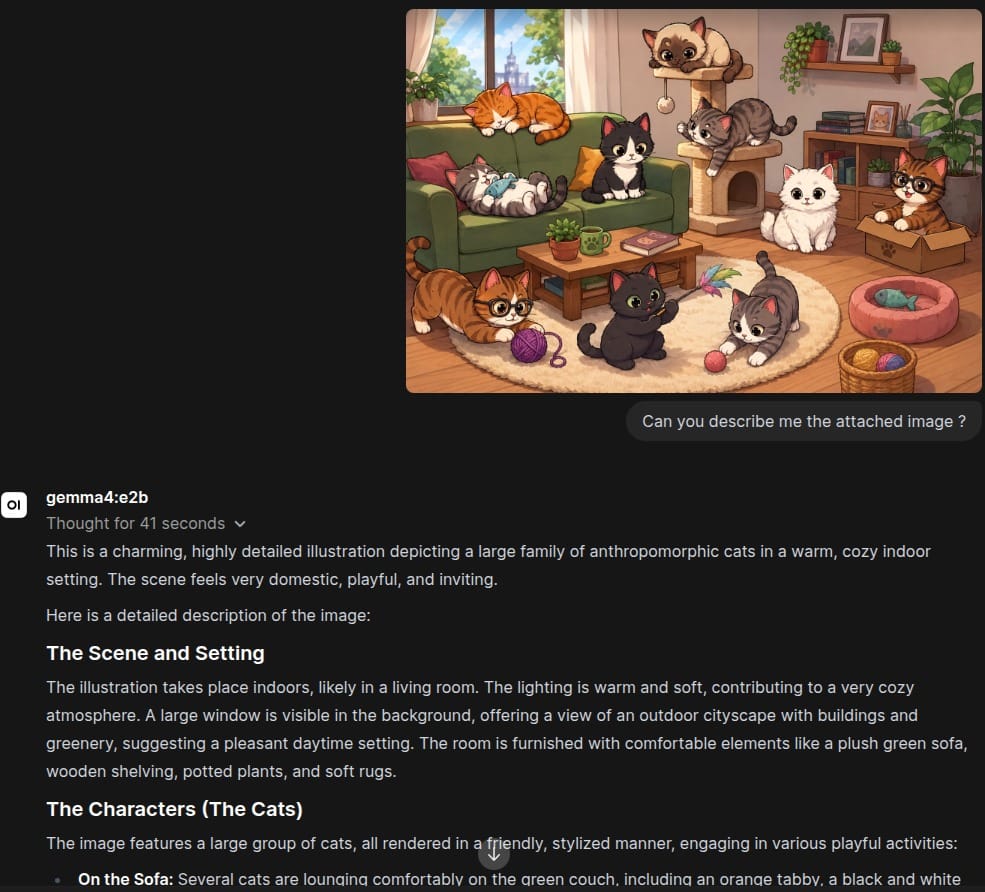
Select Gemma 4 and ask exactly the same question again while keeping the image attached.
This time, instead of reporting an error, the model analyzes the image and generates its description.
Other Useful Commands
Once Open WebUI is up and running, you'll rarely need to think about it again. Still, there are a handful of commands worth knowing for day-to-day maintenance.
⚠️ These commands expect that you've installed Open WebUI using docker, as described in the start of this articles. Your mileage may vary if you installed it differently.
Checking Whether Open WebUI Is Running
Before troubleshooting anything, it's worth checking whether the container is actually running.
docker ps
You should see an entry named open-webui with a status similar to:
CONTAINER ID   IMAGE                                  STATUS
abc123456789   ghcr.io/open-webui/open-webui:main     Up 12 minutes
If the container doesn't appear, it may have stopped. To see both running and stopped containers, use the command below instead:
docker ps -a
Viewing the Logs
Checking the logs is the next logical step. Logs usually make configuration problems, such as connection errors while trying to reach Ollama or issues loading the internal database, obvious. You can look at them by running the command below:
docker logs open-webui
To continuously watch new log messages as they appear:
docker logs -f open-webui
💡 Press Ctrl+C when you're done.
Stopping/Starting Open WebUI
If you want to temporarily shut down Open WebUI, use the command below.
docker stop open-webui
Whenever you're ready, simply start it again with the following command.
docker start open-webui
Within a few seconds, the interface should once again be available at http://localhost:3000. Since all your data lives in the Docker volume, everything -- configurations, chat history, users -- will be exactly as you left it.
💡 You can restart Open WebUI using the
docker restart open-webui
Updating Open WebUI
Open WebUI is under active development, with new features and bug fixes released frequently.
Updating it only takes a few commands.
First, stop and remove the existing container:
docker stop open-webui
docker rm open-webui
Next, download the latest version:
docker pull ghcr.io/open-webui/open-webui:main
Finally, recreate the container using the same docker run command from the installation section.
Since your data is stored in the open-webui Docker volume, your conversations, settings, uploaded files, and user accounts are preserved.
💡 If you prefer a more stable environment, consider replacing the
:maintag with a specific version. This allows you to control when upgrades happen instead of automatically following the latest development build.
Backing up your data
Backing up your entire AI workspace is straightforward. Since the chats, user accounts, settings, and uploaded files are stored in the local directory (when running docker, inside the open-webui docker volume). Creating a backup is a matter of exporting that directory.
You can create a compressed backup with:
docker run --rm \
  -v open-webui:/data \
  -v $(pwd):/backup \
  alpine \
  tar czf /backup/open-webui-backup.tar.gz -C /data .
💡 Windows user should replace
$(pwd)-- a command that returns the current on a unix-based terminal -- with the absolute path of the current directory (PowerShell users can often use${PWD}as well).
The resulting file -- open-webui-backup.tar.gz -- contains everything you need to restore your Open WebUI instance later on.
Restoring a previous backup
To restore the backup on a new machine, first create an empty open-webui volume (running the Open WebUI container once is enough), then execute:
docker run --rm \
  -v open-webui:/data \
  -v $(pwd):/backup \
  alpine \
  sh -c "cd /data && tar xzf /backup/open-webui-backup.tar.gz"
⚠️ Keep in mind that this procedure does not take into account differences between Open WebUI versions. It should be used only when restoring to the exact same Open WebUI version on which the backup was made.
Completely Uninstalling Open WebUI
If you no longer want Open WebUI on your system, first stop and remove the container:
docker stop open-webui
docker rm open-webui
At this point, the application is gone, but your data is still safely stored inside the Docker volume.
If you also want to permanently delete your conversations, accounts, settings, and uploaded files:
docker volume rm open-webui
⚠️ This permanently deletes your entire Open WebUI workspace. Make sure you've created a backup if you might want to restore it later.
Where to go next
We've spent this post getting Open WebUI up and running, switching between unimodal and multimodal models, and peeking under the hood at how tokens become embeddings. But there's a nagging question we've been dancing around: how does the model actually know anything?
Next week we will tackle how LLMs knowing facts is, in a sense, an incidental side effect of that training process and how to create robust systems that are less prone to the so called hallucinations.
FAQ
Do I need Docker to run Open WebUI?
Docker is the simplest and most common method, but it isn't the only one. You can also install Open WebUI with pip as a Python package. Docker is recommended because it bundles dependencies and keeps your data in a managed volume that survives restarts.
Why aren't my Ollama models showing up in Open WebUI?
This is almost always a connection issue. Confirm Ollama is running with the ollama list command, then check that Open WebUI points to the right API URL. Inside Docker that's http://host.docker.internal:11434, and outside Docker it's http://localhost:11434. Save and refresh after changing it.
Will using Open WebUI slow down my models?
No. Open WebUI is just a front end. The model still runs through Ollama at the same speed it would from the command line. Response times depend on your hardware and model size, not on the interface.
Why does Gemma 4 respond slower than Llama 3.2:1b?
Gemma 4 is a much larger model, so it needs more compute per token. Later in the series we'll look at how the parameter size and model architectures affect the computing power need to run inference on a particular model.
What exactly is a token? Is it the same as a word?
Not quite. A token is the smallest unit a model actually processes. It can be a whole word, or, sometimes just a piece of one (like a prefix or suffix). Images get tokenized too: a multimodal model breaks an image into small patches, and each of them becomes its own token.
What does "modality" mean, and how do I know if a model supports more than one?
A modality is simply a type of input or output a model can handle. A unimodal model, like llama 3.2:1b can only deal with text, whereas as a multimodal model like gemma 4 can process text and images. On Ollama, you can usually tell which is which by checking the model's page on the library — it lists the supported inputs (e.g. "Text, Image") right alongside the size and context window.
Local AI Playground
Real AI models running entirely in your browser. Your GPU, your data — nothing sent to a server.
Try it free